vue chrome插件开发一
研究浏览器插件开发过程, 结合vue的开发实践过程
官方开发文档入口
主要开发过程:
- 了解如何开发一个简单的chrome插件
- 如何配合vue使用
- 项目实践
开发一个简单的chrome插件
manifest.json是插件程序说明文档,也是描述入口设置文档。接下来我们说明一下开发过程
一、创建一个项目目录
- 创建目录后,进入该目录路径
mkdir chrome_focus
cd chrome_focus- 创建一个资源目录
mkdir src/assest- 拖入你的插件图标 官方通常推荐是16x16, 32x32, 48x48, 128x128四个格式 这里我们拖入focus16.png、focus48.png、 focus128.png
二、manifest.json
- 根目录下创建一个manifest.json主程序文件
touch manifest.json- 编辑插件基本信息信息
{
    "manifest_version": 3,  #主程序api版本,这个通常默认后续会说到
    "name": "chrome-focus", #关于专注度的chrome
    "description": "Browse extension to focus", #插件描述
    "author":"caffeineoddity", #作者信息
    "version": "1.0", #插件版本
    "icons": { #声明你的应用图标
        "16": "src/assets/focus16.png",
        "48": "src/assets/focus48.png",
        "128": "src/assets/focus128.png"
    }
}
基本信息配好后,其实我们已经可以加载插件到chrome里了
三、加载插件
chrome浏览器输入:
chrome://extensions/选中
加载已解压的扩展程序选择你的项目目录
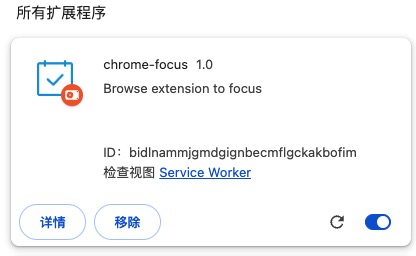
查看你的插件如下:

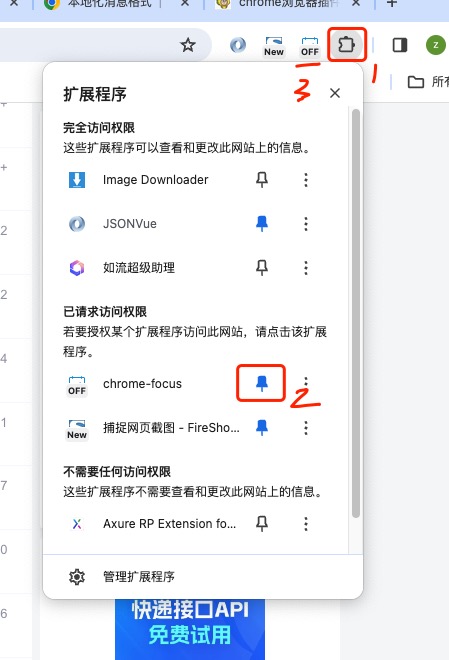
固定插件
 根据步骤1、2固定后,可以看到插件图标在3位置
修改刷新 如果你文件有改动,通过4底部的刷新按钮,刷新加载文件观看变化。
至此,你已经完成插件的初步加载过程。
四、专注模式
专注模式:是希望插件可以通过打开和关闭,隐藏网页不重要的内容。
根本原理是通过打开功能的时候,对当前焦点tab注入js脚本。增加字体效果、隐藏侧边栏等功能。
我们常见的阅读模式,就是这种原理。
- 增加一个action
{
  ..,
  "action": { ## action 默认icon。
    "default_icon": {
      "16": "src/assets/focus16.png",
      "48": "src/assets/focus48.png",
      "128": "src/assets/focus128.png"
    }
  },
}
大多数清单文件包含一个 "action" 键,用于声明 Chrome 应用作扩展程序的操作图标的图片,以及当用户点击扩展程序的操作图标时在弹出式窗口中显示的 HTML 页面 比如指定action要打开一个popup页面,详情见插件hellowold例子
- 增加一个后台脚本background.js
{
    ..,
    "background": {
      "service_worker": "src/service-worker/background.js"
  },
}
service_worker 表面我们有一个worker服务,路径是...background.js. 其实就是后台运行js的路径声明。
- 声明权限
因为我们需要让tab生效和调用js脚本,所以我们需要activeTab和scripting两个权限
{
    ..,
    "permissions": ["activeTab","scripting"],
}- 操作background.js
- 当安装程序的时候,我们希望在icon上显示一个关闭的默认状态:
chrome.runtime.onInstalled.addListener(() => {
    chrome.action.setBadgeText({
      text: "OFF",
    });
});- 当用户操作图标的时候,切换开关状态:
const extensions = 'https://developer.chrome.com/docs/extensions'
const webstore = 'https://developer.chrome.com/docs/webstore'
chrome.action.onClicked.addListener(async (tab) => {
  if (tab.url.startsWith(extensions) || tab.url.startsWith(webstore)) {
    // Retrieve the action badge to check if the extension is 'ON' or 'OFF'
    const prevState = await chrome.action.getBadgeText({ tabId: tab.id });
    // Next state will always be the opposite
    const nextState = prevState === 'ON' ? 'OFF' : 'ON'

    // Set the action badge to the next state
    await chrome.action.setBadgeText({
      tabId: tab.id,
      text: nextState,
    });
  }
});这一步可以在文献中心查看打开和关闭效果
- 隐藏页面样式
这里我们需要创建一个css文件,路径为:src/css/mode.css.
然后在切换开关的时候,选择注入和移除css样式
const extensions = 'https://developer.chrome.com/docs/extensions'
const webstore = 'https://developer.chrome.com/docs/webstore'
chrome.action.onClicked.addListener(async (tab) => {
  if (tab.url.startsWith(extensions) || tab.url.startsWith(webstore)) {
    // Retrieve the action badge to check if the extension is 'ON' or 'OFF'
    const prevState = await chrome.action.getBadgeText({ tabId: tab.id });
    // Next state will always be the opposite
    const nextState = prevState === 'ON' ? 'OFF' : 'ON'

    // Set the action badge to the next state
    await chrome.action.setBadgeText({
      tabId: tab.id,
      text: nextState,
    });

    if (nextState === "ON") {
      // Insert the CSS file when the user turns the extension on
      await chrome.scripting.insertCSS({
        files: ["src/css/mode.css"],
        target: { tabId: tab.id },
      });
    } else if (nextState === "OFF") {
      // Remove the CSS file when the user turns the extension off
      await chrome.scripting.removeCSS({
        files: ["src/css/mode.css"],
        target: { tabId: tab.id },
      });
    }
  }
});- css样式
需要关注页面的元素标签信息,然后调整样式显示。
body > .scaffold > :is(top-nav, navigation-rail, side-nav, footer),
main > :not(:last-child),
main > :last-child > navigation-tree,
main .toc-container {
  display: none;
}

main > :last-child {
  margin-top: min(10vmax, 10rem);
  margin-bottom: min(10vmax, 10rem);
}
查看效果,随着官方迭代版本,可能会丢掉元素跟踪,自行调整。
ok,到这里我们就开发了一个针对谷歌文献的专注模式的插件,后面只需要打包发布即可。
后续文章,我们会将一下怎么配合vue使用。